So I am addicted to twine. All sorts of twine. I just find it's texture so interesting, and it's possibilities endless. I love the different colors, thicknesses, coarseness, and stiffness. I'd say the *obsession* began when I came across this lovely lighting fixture at the thrift store last year:
It was actually in someone's cart when it caught my eye. I am not normally one to covet my neighbor, but this piece just *spoke* to me. The women was looking it over pretty intently and I thought she may pass on it so I *stalked* her through the store. You just never know when someone is going to change their mind! I don't think it even officially touched the shelf as she was putting it back before I snatched it up! I first tried painting it Robin's Egg blue and that was just a disaster. It didn't help that it was egg shaped to begin with! I had this nagging feeling I needed to step out of the box for this one so I slept on it for awhile. One day the thought suddenly popped into my head: TWINE!
Why not try wrapping it in twine! A little twine, a little hot glue, and a lot of patience later and this little beauty was born!
Now I am not going to lie and say the task of hand wrapping something of this scale isn't tedious. Clearly wrapping end over end, row after row, will take time. But if you like to work with your hands (I do) and am a late night person (I am) who watches mindless TV (I do) than this is the perfect project to fill that time :)
I was so smitten with this piece that I decided to do others with the same technique. I just try to make sure the beginning piece doesn't have to many overlapping parts. Those can be tricky to work with and around. Other than that everything with curvy strong parts is open game in my book!
Then I thought, why limit such a pliable medium to just wrapping? So I googled *twine words* and came across this amazing blog called Meridian Road. She has a super easy DIY twine word tutorial: http://meridianroad.blogspot.com/2010/11/twine-words.html. A little STA FLO, a few minutes to shape, and a night to dry was all it took to create these lovely little words:
I loved them so much I decided to add them to some pretty lampshades:
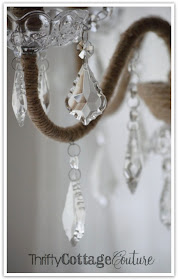
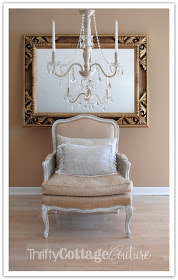
But my absolute favorite (and most time consuming of all) piece is this chrome chandelier that I wrapped in twine. It wasn't bad to start with, but the harsh shiny chrome just didn't fit with my home.
But after some serious dedication and attention to detail I was finished, & I love everything about it! I love the modesty of the twine against the glamorous crystals. It's serious, without taking itself to seriously! It is the poster child of my kind of style and it quite simply makes me happy every time I look at it :)
So there you have it. Paint, burlap, glitter and twine I'm pretty sure can make everything fine ;)
Next week I'll post some tutorials about the different techniques and materials I used!
~Pam


Pam this is absolutely fabulous! Such a different way of looking at homewares - I always look forward to seeing what you do next.
ReplyDeleteThanks so much Karen!
ReplyDeleteWOW...I'm over-the-top loving your chandelier makeover! Beautifully done! Happy to be your newest follower! Would love to have you stop by for a visit! Also following you on FB,T & P. Blessings ~ Judy
ReplyDeleteThis was great tto read
ReplyDelete